Tuesday, August 13, 2013

Simple Superhero Boys' Room


This is not going to be the most exciting post ever, but we did do some cute things with my son's room that are worth sharing.


His room was as actually not as filthy as the rest, and his carpet is the least frightening.  


We picked out this cute superhero comic book art from Meijer one night and knew that they should be the inspiration for our superhero-loving boy's bedroom.  The Avengers had just come out in theaters, and we had caught him up on all of the recent superhero movies so that he knew the characters and their stories.


I chose some paint colors that would match his superhero art but that would also allow us to redecorate someday if he changes his mind about superheroes.  I refuse to do anything in the kids' rooms that is too permanent and involves a character because they just change their mind too quickly!


Santa brought him some actual posters too, of The Avengers and all of the Marvel comic characters.  And yes, that is an Avengers bedding set that he got for his 5th birthday.


He could use a lot more shelving and toy storage, but we're holding off until we do a good clean-out of the toys first.  He's really into Legos now, so I'd rather get rid of older "baby" toys and get him a cool Lego table or something.


We still have one of the beds decorated in the former Sports theme. :o)  Oh well!  Sports and Superheroes go together, right?


Last, but not least, the closet also needed to be painted, and we had plenty of extra paint to do so.

I would like to get some curtains put up, replace his ceiling fan, get him a nightstand, that Lego table maybe, etc.  But for now, this is enough to make him like his room!

Now, if we can just get him to sleep in his own bed and play in his room rather than want to watch superhero movies on the downstairs TV all the time ......

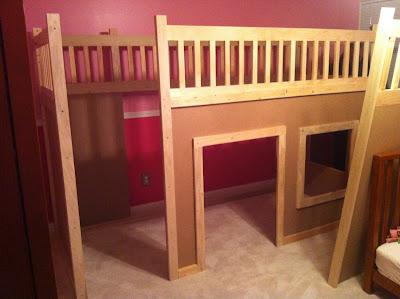
Playhouse Bed

Have you ever found something on Pinterest that was totally adorable and that you swore you had to try/have?  That never happens, right?!

Well, I found this Playhouse Loft Bed post on Ana White's popular blog and immediately fell in love.

My little girl was fast approaching her 3rd birthday, she needed incentive to spend time in her room (and sleep in it), and I was transitioning her from a toddler bed to a twin bed anyway ... My husband had the tools and skills required to build it ... I have the painting and decoration skills to make it totally adorable ... How could we NOT do this?!

So, we did.  


Following the pattern we downloaded from Ana White's blog, we purchased all of the wood and other materials, and my husband took about 2 weeks, off and on, to complete the build.


I couldn't park my car in the garage until he was ready to take the major pieces upstairs for final construction ...


He did a really good job...


All of the pieces were so heavy and large, we couldn't have done it any other way.


I am NOT looking forward to the day when this bed has to be moved!  It certainly can't be moved out of the bedroom without being taken apart.


These stairs are optional.  You have to make sure you download the correct pattern because there are two versions; one with stairs and one without.  They double as storage, so you KNOW I was all about it!


Once we had the bed built, it was my turn to paint!


I started with the white trim.  It took forever.  I had to do 2 coats, and I had to get in between all of the slats.  It was not easy!


Then I painted the main pieces purple, the primary color.  This is the same purple that I used in the girls' closet (see Girls' Room Makeover).


Then I painted the stair lids dark pink.  This is the same pink used on the walls.


It was a really big relief to have it all done!  I think I took 3 days, on and off, and I had some help with the slats because my hand got so ridiculously sore one night!


A few weeks later, I added a curtain to the window which I made with some really-delicate-and-difficult-to-work-with fabric and hung with a cheap-o white bar.


I added some purple flower embellishments and some simple purple ribbon tie-backs.


I'm really proud of work on this playhouse bed!  We really do nice work together, and I don't know a lot of couples that can say that.  Our little girl loves it ... and our son wants his own!  He sleeps with his little sister most nights now!  (Hey, whatever keeps them upstairs and out of OUR bed, right?!)  Our older daughter wants one too, even though she's entirely too tall to fit under this one.


We put the play kitchen and a bean bag chair inside.  I'd like to build out the inside to look like a little house, but I haven't found the time yet.  I thought about adding some additional decorations like flower boxes on the windows, something for the door, maybe a cute little mailbox on the side, or something that says "Home Sweet Home."  It needs a bit more character, but it's okay for now.  We certainly have bigger priorities around the house.  Maybe when my little girl gets older, she can help me make some additional decorations.

What would I do differently?  Well, if you look at the very bottom of the bed, you can see the wood color showing through by the carpet... that's because the bed was too heavy to lift up and put plastic/paper underneath so I could paint the entire baseboard! Doh!  I would consider painting certain pieces BEFORE final construction, or perhaps painting the entire thing before final construction.  Especially those slats... UGH, that was awful!  I might even consider using a spray paint or a paint gun!

If you ever decide to give something like this try, let me know... it was quite an experience!

Sunday, August 11, 2013

Girls' Room Makeover

After we moved into the new house, we appreciated having a King-sized bed because our two young kids slept more with us than in their own beds for the first 6 months.  They were spooked by every noise, being upstairs while we were downstairs, and just the newness of the whole experience.  Fortunately for me, I am a heavy sleeper, and I didn’t really notice the stowaways, but my husband is the opposite.  He tried everything to keep those kids in their beds and to get a good night’s sleep, but they just didn't like it up there.

We knew that we had to work on the kids’ rooms next and generate some excitement about sleeping in their own beds and in their own rooms.  Like every other wall in the house, the walls of their rooms were dingy, off-white, and lifeless.  Add in the fact that their toys didn't really have a “place,” and their closets didn't offer much in the way of organization, so everything was just piled up and stuffed wherever it could go.


I started with the girls’ room because I had already been buying things here and there; new matching comforters that went on sale at Target just before we moved (but before the youngest was in a twin-sized bed), organizers for hair accessories and jewelry, etc.  The girls (ages 11 and 3) helped me pick out the perfect paint colors (2 different pinks and a bold purple).


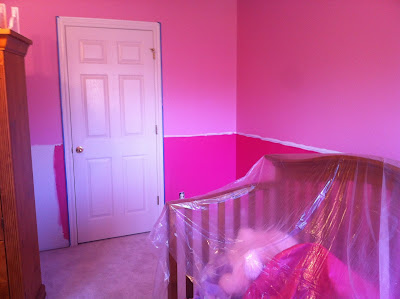
In the actual bedroom, we painted a darker pink under the white chair rail and a lighter pink above it.  The plan is to eventually install crown molding, but again, more prioritization of dollars had to happen!  We did not put any purple on the walls, and there is a reason for that … Our oldest daughter received a canopy above her bed.  It could probably use some "girl-ing" up a bit, but we've left it alone for now.


I went around every baseboard, chair rail, and window sill with white semi-gloss, and I even took down both the bedroom door and the closet door to give them a fresh coat.  When soap & water won’t wash off the funk, you just have to paint over it!

In addition to pink and purple, the plan is to accent the room with black & white patterns like damask, polka dots, zebra print, florals, etc.  Our oldest daughter has zebra sheets and a pink comforter.  I found zebra print duct tape and used it to dress up the outlet and light switch covers.  I don't really recommend this, but it turned out alright, I guess.


Once the room was finished, we moved to the closet and got the clothing situation under control.


If you already know about my severe distaste for wire shelving from reading about our Pantry re-model, then I will spare you another rant.  If you did not already know this … just know that I hate them to the point of NOT giving them to someone else once I rip them out of every closet in my house.  I will not knowingly continue the cycle of terrible shelving.  I would rather pay more for REAL shelving and be able to actually USE the full horizontal and vertical space of my closet than cheap out on a single wire shelf that holds maybe a few boxes on top.  I paid for the space in my house, and I intend to use it!

BUT – a girl’s gotta prioritize her dollars, and it just wasn't in the budget to replace any wire shelving just yet.  <sad face /> 


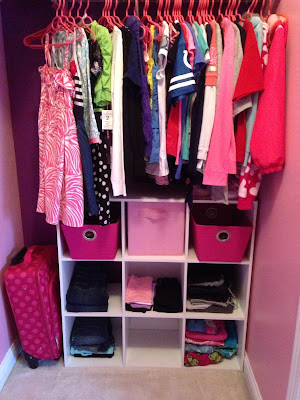
I painted the short walls purple and the long walls pink.


Instead of replacing the wire shelving, we added organization to the lower half of the closet where both girls could reach most of their own clothes and shoes.  We waited until the next Target shelving sale and scooped up some of those 3x3 square shelving units, which fit nicely on either side of the closet, one for each of them.  Add in a couple of those canvas totes for socks and undergarments, and the mess became immediately more organized.


 Our 11-year-old's side of the closet:


Our 3-year-old's side of the closet:


For shoes, we hung up a coordinating pink, black, and white organizer.


There's a lot more to do in this closet, like hang hooks for bags, purses, belts, scarves, etc.

Once the room was painted, I mentioned that our little one graduated from a toddler bed to a twin-sized bed ... It's a good thing too, because it's REALLY hard to find matching/coordinating bedding sets for a twin & toddler!

Stay tuned for my next post where the Playhouse Bed project will bed revealed...


A Fourth Purpose for Pantry: Family Central

I recently got fed up with the stacks of mail, school papers, advertisements, catalogs, etc. that always seem to clutter my counter-tops in the kitchen.  And when I say "fed up," I really mean irrationally upset.

And thus, a Fourth Purpose for our pantry was born....

On one end of the pantry we have an actual Pantry, the creation of which is described in this past post: 

On the other end we have Laundry.  On one long wall we have an eventual Mudroom area (that is currently adorned with those plastic, removable hooks and a small bench).  

And on the other long wall, we had this:


I did not want to put anything large and obtrusive here because the eventual Mudroom would take up enough space as it is.  We wouldn't be able to move around in that room very well , which kinda defeats the purpose of making it a multi-functional room.

I also had a bunch of random organizational items that we moved from the old house and had not found a new place for in the new house.  Whiteboard, calendar whiteboard, metal magazine/paper holders (whatever they're called), etc.  I did not like the idea of hanging these in the kitchen because I was going for a certain "look" in there.  I knew that putting them in the kitchen would be a "gateway drug" for other junk and miscellaneous items and papers that I, again, was tired of seeing all over my kitchen counters.

And so, I decided to make the fourth wall into a sort of "Family Central" wall where all of that stuff could exist but be fairly hidden from guests and not in the way of a kitchen's real purpose.


My handy-dandy husband was tasked with figuring out how to hang all of these things onto the wall (mostly because he won't let me TOUCH the walls... probably smart).  I arranged everything on the counter how I wanted to see it hung, and he went to work.


Within an hour, my new Family Central clutter zone was finished:


I keep all of those annoying pizza place coupons and the ever-important-to-remember-as-you're-headed-out-the-door-to-Jo-Ann-Fabrics coupons in the magazine holder things.  Some other random items have made their way in as well apparently ... sunscreen, a CD of Disney music, my checkbook ... but that's ok.  Are they on my kitchen counter? NO! = Success.

I have plans to add a few small shelves for things like sunglasses and wallets.  I'm looking for some cute key hooks, or I might make one all DIY-style.  You never know...


Sunday, January 20, 2013

Pantry Phase 1 Complete

Last fall, we stripped out the old, wire pantry shelving, repaired the walls, painted them, and installed new engineered wood flooring, which I covered in my previous post: New & Improved Pantry

Shortly after that step of the Pantry Project, we were bombarded with our children's birthdays and the holiday season, which had us pretty busy.

Somehow, in between all of that madness, we managed to complete Phase 1 of the Pantry Project, which was to install the actual pantry part of our multi-purpose utility room.  (The other 2 phases of this Pantry Project will be the Mudroom and the Laundry.)

The nook at the end of the room seemed perfect for pantry space because it is deeper than it is long, and we knew that, with 4 kids in the house, the long wall to the right would need to be the Mudroom wall.  My plan was to use every bit of the horizontal and vertical space in this nook for food and other household items.


As I was measuring and drawing out a rough sketch of the finished space, I realized that I had not accounted for another purpose of our utility room.  This is also the room where we feed our dogs and keep their water jug.  The bottom 3 1/2 feet of vertical space would be needed for the dogs' food and water. 

All dressed up for Christmas:


With the height of the bottom-most shelf figured out, I needed to figure out how I wanted to divide the remainder of the vertical space, or about 5 1/2 feet. (Our main floor ceilings are 9-ft tall throughout.)

I took some cans, cereal boxes and other things typically found in my pantry and started measuring how tall the items were by themselves and also stacked on top of each other.  That gave me a pretty good idea of how much space I wanted between the shelves.  I settled on a 12" height between each 1"-thick shelf, which  left a roughly 2-ft(-ish) space between the top shelf and the ceiling.  That's where I planned to keep larger, bulk items that aren't used as often.

The nook itself is about 20" deep, so these were going to be some pretty deep shelves with a lot of stacking room in between.  (Stoked!)  

So, with my measurements figured out, we went back to the store.  The Husband picked out the wood for the shelves, and he also chose a very ornate molding for nailing onto the front edge of each shelf.  I got paint for the shelves in a color called Celery, which was in the color palette I had chosen for the pantry.  

Later at home, once the shelves were cut to fit the nook and the molding cut to fit the shelves, it was my job to paint it all.  I forgot that I was planning to line the top side of the bottom two shelves with fabric, using the same technique as in my guest bathroom cabinet, so I painted more sides than I should have.  Once I realized my mistake, I just made sure that my husband installed the top two shelves with the green sides facing down since they would be visible when someone looks upward.


After the paint dried, my husband installed the shelving, then nailed a strip of molding to the front edge of each shelf.

Before molding:


With molding:


The bottom two shelves, not painted on top because they were to be lined with fabric:


The fabric that I chose was a 100% cotton brown and cream pattern that would complement the Hot Stone walls and Celery Green shelf molding: 


I do not actually have pictures of the fabric-lining process, but I did learn a lesson ....

Lesson 9: Nails are stronger than Glue.

(Duh, right?)

Well, this is a prime example of my tendency to just start trying something without really thinking through all of the alternatives.  I had used glue before, so I was ready to use glue again!  What I forgot to consider was that glue had been a great solution for the inside of a cabinet, the walls of which are not beaten and rubbed by cans and boxes on a daily basis.  There would be a LOT more wear & tear on these pantry shelves than the inside of that rarely-opened cabinet.  

Once I started loading objects onto the shelf, the raw edge of the fabric that I had turned under started to peel up and unravel!  It was terrible.  So, my husband (being the genius that he is), suggested that he pop the molding off of the bottom two shelves so that I could pull the front edge of the fabric down over the front edge of the wood, and then he would re-nail the molding on top to secure the fabric that way.  The edge of the fabric would be hidden by the molding.  Glue would still be used to keep the rest of the fabric from slipping and wrinkling, but at least the front edge would be secured and not budge.

And the Big Reveal of the Pantry part of our pantry.....


There is a LOT more stuffed in there than you can really see because those shelves are so deep!  I added some boot trays under the dog food and water so that we can protect our floor.  The crown molding has been purchased for the entire room, but it hasn't been installed yet.  (Had I known we would stop doing projects for a few months, I would have painted a cleaner line at the top of the wall where it meets the ceiling!)

Months later, I am still thrilled with how much stuff I can fit on these shelves.  I may continue to add organizational dividers and things, and I definitely need a nice step stool for this room as well as my kitchen cabinets (maybe one that rolls ....), but for now this part of the space is perfect!

Total cost for this part of the pantry: $151
(That includes the wood, shelf molding, paint, fabric, glue, and boot trays)