Monday, September 17, 2012

Poly Mess Turned Poly Success


This post is a continuation of Goodbye Oak, Hello Black Cherry.

After successfully staining the backs of both cabinet doors, we flipped them over and began to stain the fronts.

Lesson #2: You cannot be lazy with the power-sander.
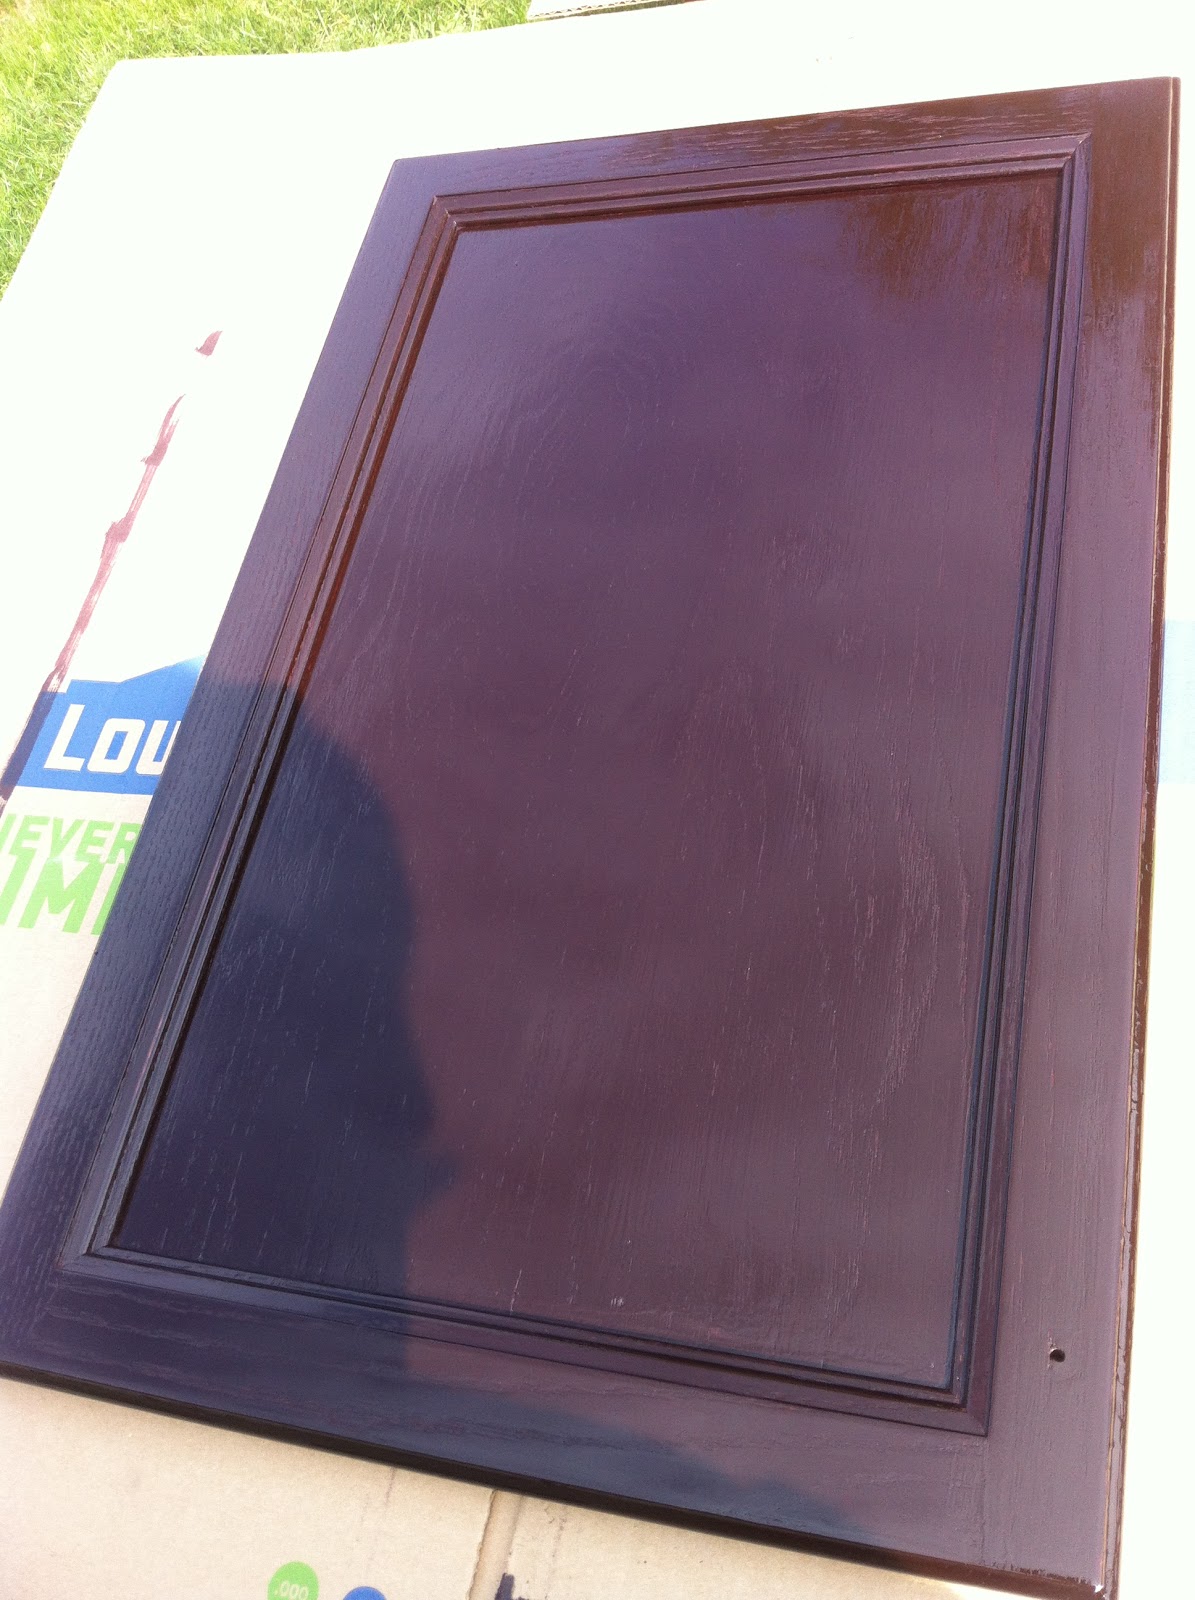
They must put a lot more polyurethane on the fronts of these cabinet doors than the backs because we clearly did not sand them down enough before applying the first coat of stain.  See how smudgy the stain is?  Yuck:


We had to follow up this coat with another round of sanding, which destroyed most of the first coat, but it was worth it to get the right soak-age the next time around.  Once we finally got through that darn polyurethane (a.k.a. the bane of my DIY existence!), we applied another coat (maybe two? I can't remember) to get the desired black cherry glow:
  

Cabinet Door #1

Cabinet Door #2


Aren't they gorgeous?! I was so excited!  I think I danced.  (In fact, I'm pretty sure I danced.)

We let the doors dry and lived our regularly scheduled programming for a few more days until an opportunity to apply the polyurethane presented itself finally.  This past Sunday, I got everything back out on the deck and prepared to do the final step, thinking the entire time that the hardest part was over.  I mean, come on... the wood grain was still showing through on two darker, beautifully stained cabinet doors and now it was time to apply some protective coating that would seal in our awesome craftmanship.  This part was going to be cake, right?!

WRONG.

Lesson #3: Don't Get Cocky.
Why I chose to start with the front of cabinet door #1, I do not know, and the decision still haunts me.  What you see here is the result of using the WRONG type of polyurethane for this particular job: Minwax Ultra-Fast Drying White Satin brush-on Polyurethane.  We now know that every part of that product's name is wrong, wrong, wrong for this project!  "Ultra-fast drying" and "white satin" and "brush-on" were a really bad move on our part.

The white color didn't tip me off right away as a bad thing because it was drying clear as I brushed it on, but then I realized that it was drying really, really fast!  I couldn't get it to spread evenly before it dried in big drops and thick lines, especially in the crevices and on the corners.  I was working furiously, trying to beat the poly and cover everything gently and equally as best I could.... but it was a total disaster.  By the time I had gone over the entire thing, I had completely ruined it.

I called for backup, insisting that my husband please tell me what I had done so wrong and why polyurethane hates me so badly.  We decided that the particular kind of poly that we bought was definitely not the right kind for this project, and that we were (ok, I was) going to have to sand off what I'd done.  Sanding would undoubtedly scratch up the final coat of stain, which would set me back a couple of steps in the process.  I was FURIOUS!

Here's my terrible poly application on cabinet door #1.  See how chunky and scratchy and white it looks, especially on that corner?


Here you can see more of the crappy poly job up close.  Note the gaping hole in the poly layer and the white poly build-up in the crevice of door #1.  


As I sat there on the deck and fumed over my failure, my husband disappeared briefly and then reappeared with an aerosol can of something.  It was a can of Minwax Fast-Drying (not Ultra) Clear Gloss (not White Satin) spray-on (not brush-on) polyurethane that he'd had in the garage for some mysterious reason.  


He grabbed cabinet door #2, scolding me (gently) for being cocky and not practicing the poly application on the back side first (which was fair), and he sprayed the back side of #2 with the other kind of poly.

It went on beautifully, as you can see below.  It was everything I had expected the first application to look like!  All the poly did was make everything shiny.  There was nothing else visibly noticeable about it.  My husband totally saved the day!  After letting the back side dry, I sprayed down the front side later that afternoon.


And here's a corner of door #2 so that you can see how the poly is supposed to look up close:


*Sigh*  With door #2 finished, it was then time to bite the bullet and fix door #1.  I plugged in the power sander and pulled as much of the poly off as I could that afternoon before having to wrap up and go do other things.  Here's what the cabinet doors look like today, side by side.  The finished door looks black in this photo, but the color really is a dark cherry, especially in the wood grain marks.  The unfinished door looks like crap, and I do not have all of the bad poly sanded off of the crevices and corners yet.


On a lighter note, somewhere in the midst of all the cabinet door drama, I managed to get the first coat applied to the cabinet itself.  See how the color now matches the toilet seat?  My only issue is the oak-colored interior of the cabinet, but I have a crafty solution for that which will be revealed in a future post!  


In addition to fixing my Poly Mess of this past weekend and applying the final stain and poly to the cabinet itself, I will be trying to find time this week for painting the walls in the guest bathroom.  (We have a wedding in the family, so I'm not optimistic that we'll get to this before Sunday.)  From there, I'll be ready to start staining the mirror frame that I'm going to make out of a long baseboard stick that my husband is going to cut for me, and I think he's going to start installing the backsplash.  Niether of us have done either of these upcoming projects, so there are many more learning experiences for us on the horizon!  

I cannot wait for the Big Reveal on our Guest Bathroom project!  It's going to be the best-looking room in our house come Halloween, I just know it!

Goodbye Oak, Hello Black Cherry

"In the spirit of science, there really is no such thing as a 'failed experiment.' Any test that yields valid data is a valid test." -- Adam Savage (Mythbusters)

No disrespect to oak-colored cabinets and those who love them, but I knew from the day I met my new kitchen that the oak color just would not work with my vision for the most heavily used and deeply loved room of our house.  No sooner did the words "I want to stain them darker" come out of my mouth than my husband began to hyperventilate.

Not that he didn't agree and not that he didn't want the same look, but his issue with the idea had to do with time commitment and possible failure.  Doing it ourselves would clearly be cheaper from a dollar perspective, but with 38 cabinets, drawers and their faces to take down, sand, stain, poly, and re-attach, it would easily cost us days of our already limited family time to accomplish such a goal.  And then there was the issue with possible failure since most cabinets that are installed in newer homes these days are laminate rather than actual wood, and the parts that are actual wood are generally covered in thick layers of polyurethane that is intended to prevent exactly what we intended to do: destroy the color of the wood underneath!

I'm not a person that generally responds well to being told 'No,' so I suggested an alternative to taking on the 38-cabinet kitchen: the 2-cabinet guest bathroom!

UPDATE:
Here is a Before picture of the Guest Bathroom that my husband snapped during the final walkthrough and was hiding on his phone.  The stone tile, toilet, wood cabinet and mirror will be kept ... but that's about it:


My husband popped off the two cabinet doors, and we grabbed the necessary supplies from Lowe's.  (Wood stain, sanding blocks and sandpaper sheets, rubber sponge brushes, polyurethane, a nylon paintbrush for applying the poly, etc.)  We sanded down the doors with a power-sander and sanding blocks for the intricate edges, working hard to remove all traces of the polyurethane coating and getting down to the actual wood part underneath.  Then we practiced staining the back of one of the doors with a Rust-oleum Black Cherry wood stain.  (Ruin the back of one? Meh ...)


Lesson #1: You need to let that stain stuff marinade on lighter-colored cabinets.
That first layer of stain soaked in just fine, but it was not dark enough.  We wanted such a drastic color change that we should have let the stain sink in a bit longer before wiping away the excess.  As you can see by this picture, the goal was to stain the cabinet to match the toilet seat that I bought.  (You can also see the original cabinet color behind the not-dark-enough door):


A second coat of stain on door #1 (pictured on top) and a first coat of stain on cabinet #2 (pictured on bottom), with proper soaking time, yielded the following:


You have no idea how giddy I was to see such a beautiful result!

A week passed before I had the chance to get back to these doors for applying the polyurethane and to the cabinet structure itself in the bathroom, so stay tuned!  I learned a very, very painful lesson about polyurethane that you will not want to miss.


Thursday, September 13, 2012

Death of a Mural


"Pictures deface walls more often than they decorate them." --William Wordsworth

Word, Mr. Wordsworth.  In the case of our kitchen mural, you are on point!

If you thought the random kitchen wall that we tore down was ... well, random ... then take a look at this mural that once graced the opposite kitchen wall!


Yes, it's wallpaper.  Yes, it's a formal garden on wallpaper.  Yes, it's a formal garden on wallpaper glued to my kitchen.

And Yes, it had to come down.

We took a random trip to Goodwill one evening and were looking for furniture to refurbish or shelving to use for one of the closets.  What my husband found instead was a 1989 Black & Decker wallpaper steamer for $10!  At first, I was irritated, thinking that there was no way this thing actually worked.  I had steamed wallpaper before at my parents' house, and it had been a total disaster.

But lo and behold, what you see here is definitely NOT a disaster!


It took less than 3 hours for him to steam and wipe down the entire wall.  There was very little damage to the drywall, which we'll have someone fix along with the drywall where that other wall came down.  I got all of the sticky paper swept up, and I even managed to find the wrinkled up piece that had the creepy lady sitting on a park bench behind the garden:


By the end of the night, that ridiculous mural was gone!  I pinned the creepy lady to our family corkboard, and then I stuck that wallpaper steamer on a shelf next to the four spindles down in that same unnecessary basement storage room for safe keeping.  You just never know when you'll need to completely reverse someone's decision to use wallpaper!  (I have a feeling that that storage room is going to get more and more necessary as we go...)


Ta-Da!  A perfectly informal, garden-less wall ... that I now have no clue what to do with. :-/  (Did someone say 'Pinterest'??)

There was another perk to our evening too, and that was the awesome find we made at Menards earlier that day.  Four reasonably-priced, perfectly-sized stools for our super-long counter.  They were added just in time to entertain for my husband's birthday a couple of days later!  They don't go with the floor or the cabinets, but there's a good reason for that.  That oak-colored laminate is not long for my kitchen ... just as soon as we can save up the money to replace it with something darker, richer and [preferably] real wood.


Coming up next ................... I gamble the cabinets in our Guest Bathroom as an experiment to see if they can be sanded and stained darker without looking like junk.  If I'm successful, the Kitchen Cabinet Makeover will begin shortly after the holidays!  If I'm not successful, I will slip into a deep, dark depression until we figure out an alternative for getting the cabinet color I want in the kitchen!  Wish me luck!


Demolition Man


"Love recognizes no barriers. It jumps hurdles, leaps fences, penetrates walls to arrive at it's destination full of hope." -- Maya Angelou

I don't know that it was love that made my husband 'penetrate' the wall that divided our new living room and kitchen, but penetrate it he did until the whole thing came crashing down!

And he did so within five minutes of taking possession of the house on the day we signed the papers.  I was plopping our two small children onto the kitchen counter with cheeseburgers and french fries for dinner (don't judge me - it was a busy day!) when I heard the first WHACK! of his hammer and saw plaster begin to fly.

For some strange reason, the previous owners had built a wall between the living room and kitchen.  It was obvious (even to me) that the wall had not been there since the birth of the house.  It's existence prevented free and natural movement through the most heavily trafficked areas of most people's houses, and we were completely baffled by their decision to build it.  So baffled, in fact, that my husband had been plotting his attack since the day we first saw the house!

See for yourself:


Now, the wall did restrict movement between both rooms, but at least there was a window so that people could still see each other and have a conversation between those four awesome spindles, right?!  (By the way, don't forget about those spindles.  I've tucked them away in one of the extremely unnecessary storage rooms down in the basement, and they will become a part of something else one day ...)

And here's the husband 'penetrating' the wall (ain't he cute?):


Within the hour, he had most of the wall torn down ... and realized that he probably should have put down some kind of cloth to catch the rubble.  (Oh wait, that was me who scolded his messy oversight...)  Fortunately, we hadn't cleaned the carpets yet ... or anything else for that matter.  After all, we had only been in the house for less than an hour at that point!


Slowly but surely, the wall kept coming down until finally, it looked like this:


Now THAT'S an open floorplan!  

We could not think of a better way to break in the new house than by ... breaking the new house (in a good way).  There's still some work to do on the drywall, and we'll eventually get that section of the floor taken care of.  For now, it's covered with a few cheap rugs to prevent tripping (not pictured).  

All in all, a successful first project!


Wednesday, September 12, 2012

The Journey Begins


"Family is not an important thing, it's everything." -- Michael J. Fox

Our family has moved into a new house on a different side of the same city, and we did so because of our family.

Not only do my husband's kids (... and my stepkids .. and my children's half-siblings) live on this side of town, but we have heard great things about the schools in this area and were ready to leave behind our first home in a struggling neighborhood.  The only person not on board with our move was my mother, but she has come around and understands that our decision was made for one reason and one reason alone:

Our family.

My husband and I looked at hundreds of homes online and did 20+ walkthroughs before stepping foot into the house we now call Home.  We changed our minds a lot about the importance of basements, kitchens, fences, decks,  landscapes, fireplaces, spacious closets and master suites, and we probably drove our agent crazy.  Most houses we looked at did not have all of our Must-Haves, and a few houses had almost enough of them to earn our offer.  There was just something about every house that didn't satisfy our tastes.  The process was very frustrating... until we finally found the house that felt like US!

Sometimes we would look at houses more out of curiosity than real interest, or we just looked at them because they were vacant and a walkthrough would be easy to schedule. Our house was the last on a long afternoon list of houses, it was at least a mile further north than we really wanted to live, and it was listed at the tip top of our comfortable budget.  We walked into it with reluctantly made-up minds about a different house we had seen that day.  We had mutually compromised that a small yard and being backed up to another person's small yard was just going to have to be 'good enough' for the sake of buying everything else we wanted inside the house.  It was fate that we walked into that last house on the list that we were more curious about than truly interested in because we would have chosen the wrong house out of pure desperation!

On the inside of this very last house on the list, everything was still white from when the house had been built.  Not clean, but white.  The walls were actually pretty dirty, scuffed up and even scribbled on in places.  The carpets were very light and showing signs of poor installation, dirt and possible pet abuse.  The fixtures were all standard; not a single upgraded anything, from the door knobs to bathroom lighting to shower-heads and faucets.  There was little evidence that love had ever filled the house, and it felt to me like a giant skeleton of some unfortunate family's struggle to keep a house they couldn't afford to care for and make a home.

When I say the house is "giant" ... I mean it.  The house just kept going in every direction. Closets were twice as large as their standard-sized doors would let on, with the Master Closet dwarfing most people's bedrooms.  The kitchen was three times the size of my old one with tall cabinets and long counter tops.  Upstairs, each bedroom could easily hold two beds and furniture, with a central playroom/loft to contain the toys.  The backyard was of similar size to our old yard, minus the beloved pond, but it was tree-lined for privacy and didn't back up closely to anyone else's yard.  By the time we got to the basement, we had already seen a house that could accommodate the growth of our family.  In the basement (a.k.a. the house below our house), we found a great room, a bedroom, a partial kitchen, a full bathroom, two bonus rooms, and two storage rooms with enough shelf space to store a few families' Christmas decorations!

It was obscene, the size of this house.  The layout was exactly what we wanted.  All of our Must-Haves were present, without exception.  There was not a thing wrong with the house structurally, as far as we could tell prior to an inspection, and it was only the filth and grime that made us uneasy.  Despite that one detail - the FILTH - we had made our decision.  This house was the best house for us, and we knew we had to act fast.  We made our offer within an hour, and we never doubted that decision for a second afterward.

What struck us most about the house was it's potential.  Yes, it was big.  Yes, it was priced to sell by the bank.  (Yes, I was in love with the kitchen and closets.)  The house had not been abused - just neglected.  The true reason for our making an offer on the house so quickly and confidently was it's need for tender loving care and our matching desire to put that kind of love into making a house our Home.

So we've bought ourselves a Project House!  A house we can love and nurture for years and years to make it our own ... just like the family we're raising inside of it.  A house we can evolve from .... wait for it .... Filthy to Flawless!

Naturally, this blog is for our house and the journey to making it a Home.  Bring on the Pinterest ideas and DIY tutorials!  Get ready to curse our failures with us and celebrate our successes!  If you're a close friend or relative reading this, feel free to grab a paintbrush or just pretend that you're busy every time we post what our next endeavor will be!

Here's to our New Home ... the newest member of our family!